Wednesday, July 16, 2014

Journal Love

When we became members of a new church, we went through a new member class.  It was a really neat opportunity to learn more ways to strengthen our faith.  I have never been a regular Bible reader.  It always overwhelms me, but I do have the desire.  Our pastor told me about a way that he does his daily readings.  He uses the S.O.A.P. method.  This involves having a journal to write in.  That got me excited!  I kept thinking about how I could decorate my own journal!

I had several composition notebooks lying around the house, so I painted gesso on the front and back covers and got creating!  I covered the front and back with some cheap tissue paper I bought from Hobby Lobby, then I covered that with cheap craft paint.  I used acrylic inks to add drips and drops and splatters.  For the leaves, I used a handcarved stamp on already inked dictionary pages.  Then I cut those out and glued them to the front.  I used a black neocolor watercolor crayon to trace around the leaves.  Then I wrote random Bible verses around the edge of the front and back covers.  I sealed the entire thing with spray sealant and Ta-Da!  This is the finished product!

I absolutely love it and since it's visually stimulating it motivates me to use it! 


In case your wondering what the S.O.A.P. method is I'll explain.  S stands for scripture.  You choose a verse to read and write it down.  O stands for observations.  You then write your observations about the verse.  It doesn't have to be lengthy.  A stands for application.  At this point, you can write about how you are going to apply the verse to your everday life.  P stands for prayer.  Afterwards, write your response to God and anything else you need to bring to Him. 

It's an organized way to get your daily reading in, which helps me not feel so overwhelmed. 

 
Happy journaling!

Wednesday, May 28, 2014


There have been some changes at my house lately.  My husband took a new, amazing job with Shell Oil last year, with the understanding that there would be some travel.  Well, he has definitely been doing some traveling!!! He's been to Amsterdam, England, Saudi Arabia, and Argentina.  This last trip to Argentina was a long one!  1 month!  We have never been apart for that long before.  His boss told him that while he was there, I should go visit.  He could take a few days off and show me around.  Now, most people would probably jump at the chance to travel to another country.  But I am not most people.  I have anxiety and it sucks!  It tries to keep me from doing adventurous things.  The thought of being stuck on a plane for ten hours and not being able to get off brought about a panic attack all by itself!  My instinct was to just say "no way" and stay safe and sound at home.  But I knew that it was a once in a lifetime opportunity and that it would help break up the trip for my husband.  So, I went to speak with my therapist about it.  She really helped encourage me to give it a try.   So, I told my husband I would go and we went ahead and booked the flight.  No turning back!  

I was still very nervous about the whole thing, so I decided to do a ton of research on where I was going.  Then, at least, things would seem familiar.  I googled all I could about Buenos Aires, Argentina and found out that it is an amazing city, teeming with art and soul.  That was when my focus switched from one of "just traveling" to one of an "art adventure".  Graffiti is not illegal in Buenos Aires, so the city is filled with amazing street art!  I booked us a walking tour.  I also found out that Buenos Aires is home to one of the most beautiful cemeteries, Recoleta.  Talk about artistic inspiration!  The more I researched, the more excited I became.  I couldn't wait to explore Argentina with my husband.

I can't say that the trip was completely anxiety free, because it wasn't.  Anxiety does not go down without a fight.  But I can say that the plane trip was uneventful, thanks to my anti anxiety meds and the trip was amazing!  I am so glad that I did not let anxiety rule my decisions!  I had the time of my life and it also gave me an extra boost of confidence that I can do things that scare me when I set my mind to it!  


This is a page from my art journal that I made when I got back.  I got the quote and idea from Neil Gaimmon's book "The Ocean at the End of the Lane." 


Please know that if you suffer from anxiety, you are not alone.  There are sooooo many of us out there!  Talk with your doctor or therapist.  Therapy and medicines do work.  It's not something that will magically go away, but you can learn to live with it and rise above it!

Friday, May 9, 2014

Sketching with colored pencil


I am taking a new online art class by Jane Davenport called Whimsical Faces.  I've always liked her style.  One of the things she stresses is sketching using prismacolor pencils.  That way you can't erase and it forces you to be more loose with your sketches.  
 
This was my first "Whimsical Face" and I thought she came out pretty good!  I highly recommend Jane's class.  It's only $20.00, which I think is a steal!


Side note:  My husband left for Buenos Aires, Argentina for a month.  We have never been away from each other for that long.  He suggested that I come visit him for a few days and at first my anxiety kicked in and I couldn't imagine traveling on a plane for 10 hours.  I am claustrophobic and I have been known to have a panic attack or two!  So I was really nervous about the idea of going out of the country.  But the more I looked into it;  The more I researched Buenos Aires, I realized what an amazing opportunity this will be!  The city is rich with art!  Street art is everywhere and the buildings and cemetery are beautiful!!!  So, I will be joining my husband in about a week.  I can't wait to share with you all of the wonderful things that we will see.  I know that I will also be so proud of myself for conquering this fear.
 

Sunday, April 13, 2014

Here's my heart, Lord


There's a song on KSBJ, our local Christian radio station, that always gets me singing.  It's a remake of an older hymn and there's a part that says, "Here's my heart, Lord.  Take and seal it.  Seal it for Thy course above."  For several weeks I've wanted to create something using those words.  I had an idea in my head, so last night, I took out my newest supplies (Gelli plate and bees wax) and started playing.

Warning: The Gelli Plate is highly addictive!  :)

  I first created the background with the Gelli plate.  I brayered black and teal acrylic paint all of the surface.  Then I laid a stencil down on top of the paint.  I placed the paper down and brayered it.  This was the print that came up.  I then placed my art journal on the gelli plate and pulled up the "ghost" image for later.  I'm really loving my gelli plate! 

I then took a sharpie x-fine paint pen and randomly wrote the lyrics of the song onto the background. 


 I glued down a corrugated ATC card, that I distressed with archival black ink, and on top of that I glued a page from an old dictionary with different words that include the word heart.  I had some painted paper leftover from a project that I did from my Soul Food class over at Community Thrive.  The classes are a lot of fun and you learn so many different techniques!  I cut a heart out of the painted paper and glued it down.  Then I busted out my beeswax and quilting iron. 

Sidebar: I bought the melting pot from Ranger, but I actually like melting the wax right onto the page using a quilting iron.  With the melting pot, by the time I put the wax on the brush and put it onto the paper, the wax is starting to dry and I don't have as much control.  With the quilting iron I can heat the wax while it's on the project and move it around until I get the coverage I want.

Anyways, I put several of the Ranger bees wax (pellets?) onto the heart and then melted them with the iron.  While the wax was still melted, I pressed a metal cross into it.  Then I melted wax over the dictionary paper.  


I finished the project off with Tim Holtz label letters to spell sealed.  I really like how it turned out.  I think it would be pretty mounted on a piece of red cardstock.  Oops, I forgot one step.  For the background, I watered down some red golden fluid acrylic paint and then splattered it randomly using a toothbrush.  That way the background ties into the rest of the picture.


I hope you like it!

Saturday, April 5, 2014

I will keep you safe and warm

I was playing in my Moleskein with my new book from Suzi Blu,Mixed-Media girls.  I love how she explains step-by-step the shading of the face.  Follow the link to purchase her book!  It's awesome!

This sweet girl was the result.  It's definitely a practice, since you can see the hair lines that run through the deer's ear.  I copied it and then transferred the picture to another piece of mixed-media paper.  I am going to attempt to replicate it.  I've transferred drawings before, but I know that even when the pencil lines (bones) of the drawing are the same, no two pieces come out the same.  It's all the other stuff, the paint, colored pencil (flesh) of the drawing that always varies.  

Once I'm done, I'm going to add the words "I will keep you safe and warm" to her hair.  I have really been digging gouache paint.  It's my new favorite!  My other new favorite is the sparkly gelli roll pens.  I love sparkles and glitter!  


Don't be afraid to try new supplies.  I was really nervous about trying gouache, but now I love it!


Monday, March 17, 2014

Beeswax


I'm almost finished with my retro camper painting.  I want to incorporate beeswax,but since I've never used it, I need to practice. I don't want to ruin my hard work.  Here's what I've done so far.


It needs something else, but I haven't figured that part out yet.  I'm sure it will eventually come to me!


Saturday, March 8, 2014

Retro camper


Last October my sweet 99 year old grandmother passed away.  She was three weeks shy of turning 100.  When I learned that she was failing, I jumped on a plane to North Carolina.  I couldn't bare to think that she would be alone during this transition in life.  When I arrived I just took over her care.  I sat with her while she rested and gave her iced tea when she was thirsty.  When she couldn't relax due to not being able to urinate, I had the hospice nurse put in a catheter.  Afterwards, she was able to sleep in peace.  It was just a few days later that she let go and moved over to the other side.  I was honored to be there.  I was touched when she cried out for me by name.  It was one of the most beautiful moments of my life.

My favorite picture is the one where my grandmother and grandfather are standing in front of their camper.  They enjoyed camping with their extended family and did it often.  This is where I got my inspiration for my latest painting.


My grandfather passed away about 18 years ago.  He was my grandmother's everything.  Knowing that they are now together makes me smile.

I have this picture on my art desk.  I am currently working on a multi-media piece that includes a little camper like the one in the picture.  It has been a long time since I've created a large piece, so I'm really excited to see how it turns out.  As soon as it's finished, I will show it to you.  Here's a quick pencil drawing of the little girl that will be in the painting.


Now I'm off to create!  See you soon!

Saturday, March 1, 2014

This little light of mine

It has been so nice getting back into art journaling.  I really can't believe that I have been away as long as I have.  Some of the new art supplies I have been using are gauche, dyllusions ink sprays, tissue paper, and string gel.  Of course, I haven't stopped making pretty girls.  They just really make me happy!  I worked on "This little light of mine" for a few days and I covered it with string gel.  This is the first time I've ever used the gel and I love the effect it gives.  It creates a lovely waxy, glossy layer over your art, giving it more dimension.  This picture isn't the best, but in person the effect is great!

When you first put it on, it is a little cloudy.  Don't worry!  Just let it sit on a level counter for a day or two.  It will dry to a beautiful, clear glossy finish!

In between working on this piece, I also played in my art journal.  I tried to use colors that I normally don't.  It was fun, but I realized that certain colors just make me happier than others! :)

Here is one of those pages.
Not one of my favorites, but it was still fun to create.  You never know what color combinations you are going to like unless you get in there and play!

Happy creating!!!


Thursday, February 20, 2014

Planners can be fun!


I was introduced to the idea of combining my planner and art journaling into one location by Suzi Blu.  I have always been extremely unorganized and the thought of making my planner fun never entered my mind!  So, after reading Suzi's posts about making a planner, I decided to give it a whirl.  I chose the Kikki K planner after doing quite a bit of research on Filofax and other planners.  It had similar features of the Filofax, but was not as costly.  Plus, they had really good reviews.  When it came in I was soooooo excited, like I was eight years old again and it was Christmas morning! It came wrapped in the cutest white tissue paper that had images of envelopes all over it.  I saved that for my art journals. One of the easiest ways to take your boring calendar pages and make them exciting is with stickers. I had forgotten how much I love stickers. And you can find some super cute ones in the clearance section of craft stores.  Stickers are NOT just for kids, by the way.  The dividers that came with the planner were plain navy blue, so those had to be changed.  I used them as a template and made my own dividers out of cardstock from Hobby Lobby.  I also used washi tape that I got from Office Depot to reinforce the edges.  I didn't buy a fancy six hole punch.  I just used my plain Jane single hole punch.  It took longer, but it wasn't a big deal.
 
Here's a picture of the first thing you see when you open my planner.  I wanted it to be fun and pretty! 
 
 
It makes me smile every time I open it up!


I found these cute little envelopes and stickers in the clearance section of Hobby Lobby.  I just love them!


Here is a picture of my typical week.  I love the two page week layout.  Everything is color coded to make it easier.  My work stuff is green, yellow is my personal stuff, pink is for my oldest daughter, blue is for my youngest, and orange is for my husband.  It has really worked out well.  I have become so organized that I don't even recognize myself!


Lastly, here is a picture of my dividers.  Before I made them I sat down and made a list of what types of things I wanted to keep track of in my planner.  I settled on 5 sections.  My calendar and weekly pages, my notes, birthdays, prayers, and passwords.  Then I added an envelope in the back to hold more stickers.  The prayer section has worked out awesome.  When I'm out and about and someone asks for prayer, I can just put that prayer down so that I don't forget to lift it up to God later.  I also enjoy highlighting the prayers that God answers.  It is really eye opening to see just how much God listens and responds to our pleas. 


I hope this helps to inspire you to get creative with the everyday "have to's" of life.  It has really made a difference for me in how I look at planning my life.  It is definitely much more fun!!!

Friday, February 14, 2014

New Beginning

It has been a very long time since I have posted anything.  Last February I had a depressive episode that knocked me down.  It was only until this past January that I have picked up my art supplies and began creating again.  I hadn't realized how much I missed it!

I first went to youtube and pinterest to help me get my mojo back.  It had been so long that I was a little rusty.  But just like anything else, once I started creating, it became much easier.  With each new piece I am getting a little bit better (artistically).  Mentally, I am doing great!  With the support of my friends and family, medication adjustments, and wonderful counseling, I came through the episode relatively quickly.  (Although, time stands still when your in it!)

So, having said all of that, I wanted to share with you an art journal prompt that really excited me.  It's called What is your totem animal?

One of the things I learned in counseling is that the psyche is aware of so much more than our conscious realizes.  And this is universal.  That is why, for example, the symbol of a bird is used to represent freedom across many cultures. 

American Indians used animals to represent certain personality traits in people.  They are called a person's totem animal and it represents all of the complexities of their personality. 

I was curious to see what my totem animal was, so I visited a website 
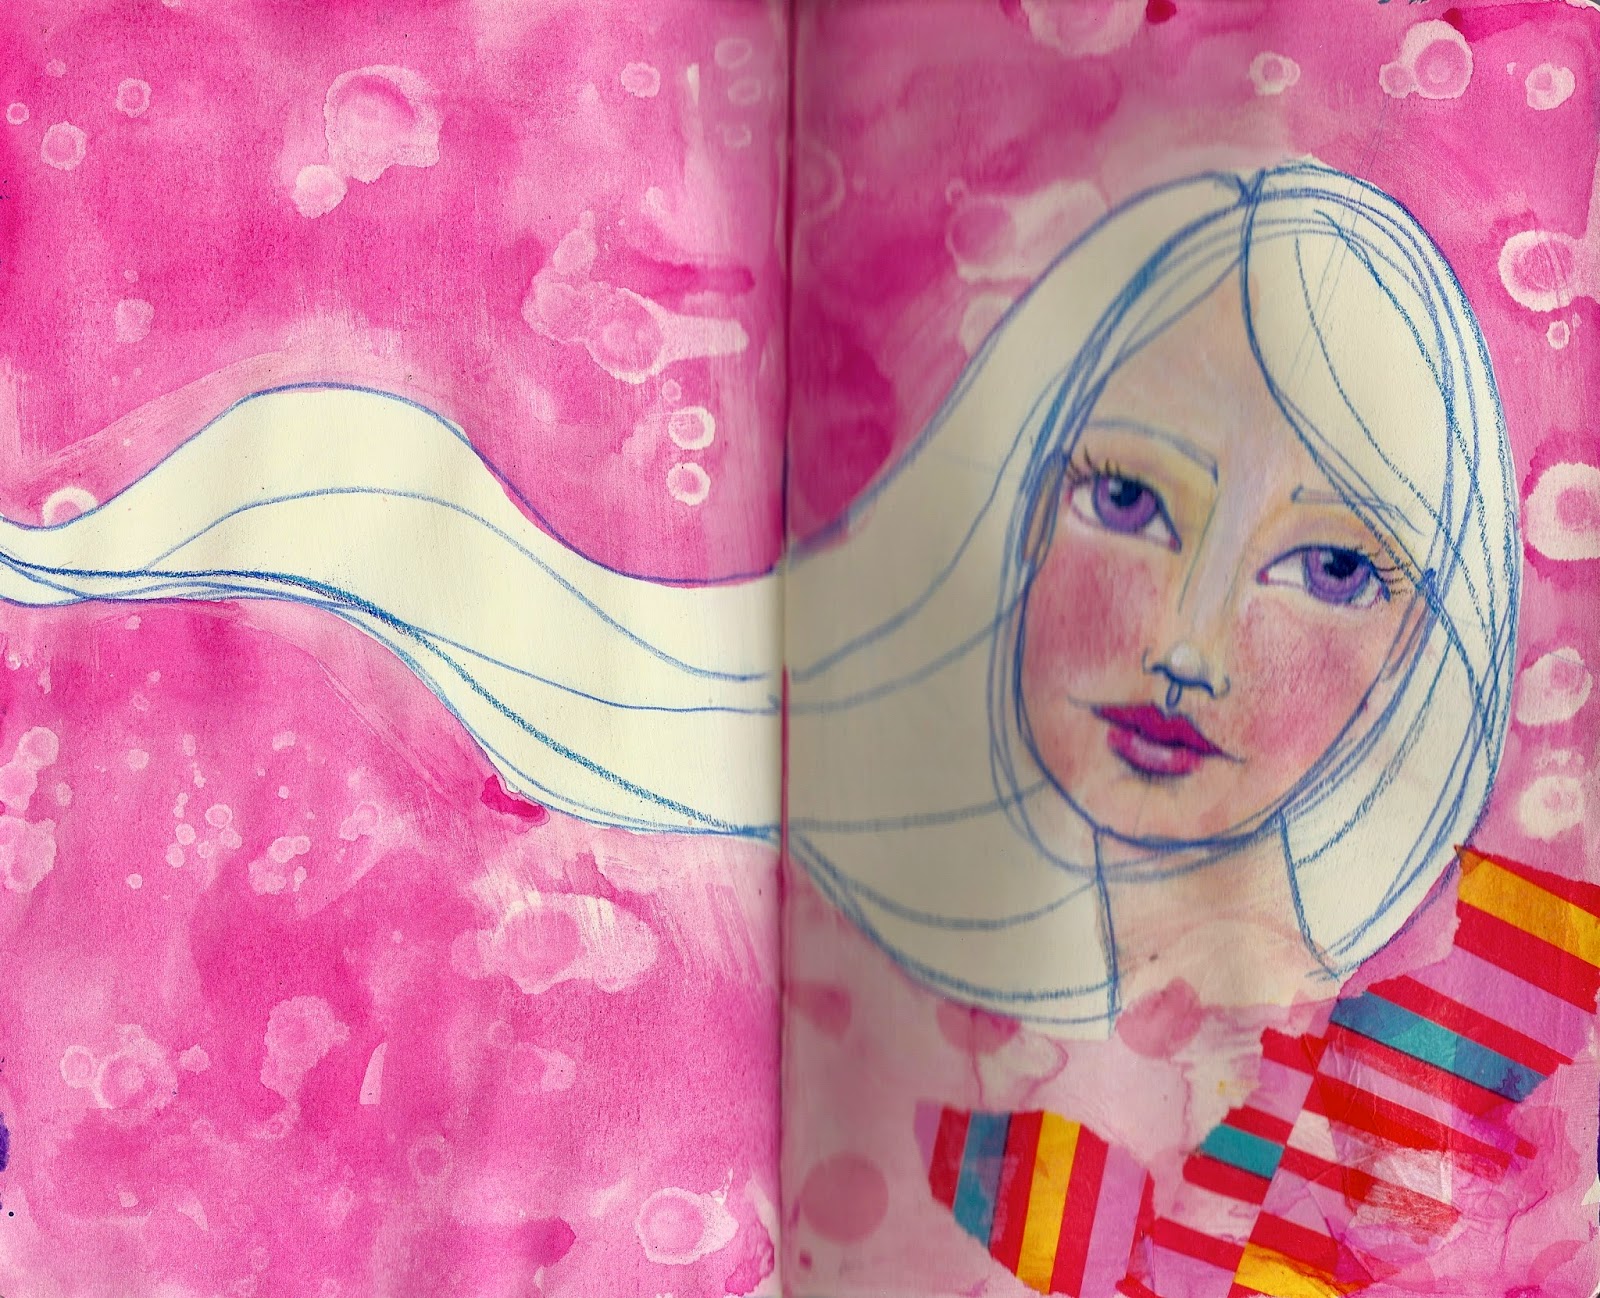
http://www.allthetests.com/quiz10/quiz/1095198776/What-Totem-Animal-Are-You to take a free test.  The results were amazing!  I was actually a mixture of three animals.  The butterfly, eagle, and bear.  I really connected to the butterfly and that is the animal I chose to journal about.  (Technically it's an insect, but whatever!)

Here is what I came up with:


So, I challenge you to take the quiz and then do an art journal page that celebrates your totem animal.

I would love to see what you come up with.